Thursday 29 August 2013

Chunky Monkey Smoothie


This is an excellent smoothie for a quick and lasting energy boost and a healthy alternative to a sweet treat.


You will need:
1 medium to large size banana
1 heaping tablespoon of peanut butter (or nut butter of your choice)
1 cup chocolate coconut milk (or chocolate milk of your choice - also works with regular milk if you add  teaspoon of cocoa)
1/4 oats (cooked or uncooked)
1/2 cup of ice
 
1. Add milk and ice to blender and blend until nearly smooth
2. Add banana, oats and peanut butter to the mix (and now cocoa if you are choosing to use non-chocolate milk) and blend until smooth
3. Serve and enjoy!


Monday 26 August 2013

Chocolate Avocado Pudding...that actually tastes like chocolate pudding

I was skeptical to try this, but it is a delicious way to get those heart-healthy fats, especially for those who don't like avocados! It actually tastes an smells like chocolate pudding.


You will need:
1 avocado
1 heaping teaspoon of cocoa
2 packets of Truvia or 2 big tbsps. of honey
1/4 cup unsweetened coconut milk (or creamy milk of your choice)
1 stemmed cherry to garnish (optional)
 
1. Cut, peel and pit the avocado and add to the blender.
2. Add in milk and blend the avocado and milk together.
3. Mix in cocoa and Truvia/honey and blend until smooth.
 
*Note: I prefer anything chocolate to be more on the bitter side, so don't be afraid to taste test and add more or less cocoa or sweetener as you desire!
 
Serve and enjoy!
 
I got this idea from http://www.mindbodygreen.com/ which is an incredible blog to check out for health and wellness. I did modify the recipe to make it my own, but I would recommend testing out their version as well!


Guiltless Iced Chocolate

Today I had a terrible caving for chocolate (surprise...), but I didn't want to indulge so I managed to come up with this super low-cal, low-fat, dairy-free...but delicious treat!


You will need:
1 cup of ice
1/2 a cup of unsweetened coconut milk (or milk of your choice)
1 rounded teaspoon of cocoa
1/2 a packet of Truvia
1 dollop of light Cool Whip

1. Add ice and milk to blender and blend almost completely.
2. Add cocoa and Truvia to the mix and finish blending until desired thickness.
3. Pour and add a dollop of Cool Whip to the top and voila! Chocolatey deliciousness without the guilt!

Thursday 15 August 2013

Gluten-Free Cinnamon Tortilla Chips with Blueberry-Mango Fruit Salsa


Today I realized I had way more gluten free tortillas left than I could eat as wraps, so I decided to mix things up a bit. Let's just say the results were pretty amazing.


You will need:
1 pan
Tinfoil
1 tsp. of coconut oil (preferably organic and unrefined)
2 large gluten free tortillas (or 4 small ones...or tortillas of your choice)
Cinnamon to sprinkle
1/2 cup of fresh mango
1/2 cup of fresh blueberries
1 heaping tbsp. of Light Cool Whip

Steps:
1. Preheat the oven to 350F. Cover your pan with tinfoil (you can spray it with cooking spray if you feel the tortillas might stick...I didn't...probably should have. Haha.)


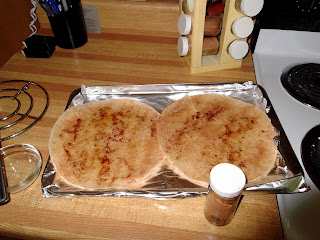
2. Lay out your tortillas on the pan and get a teaspoon of coconut oil out.

3. Place the coconut oil in a boil and microwave until melted.

4. Spread/drizzle the coconut oil over the tortillas and then sprinkle cinnamon over them (use as much as you like)

5. Cut the tortillas into little triangle-shaped pieces about the size of average tortilla chips (triangle-SHAPED is the keyword. Mine tend to vary as the cutting goes on...haha). Place in the oven for about 5 minutes or until they have reach desired crispiness.

6. Chop up blueberries. (I put wax paper over the cutting board because it makes my life easier when it comes time to clean up)

7. Chop up the mango.

8. Place the blueberries and mango in a bowl and mix together.

9. This is optional, but I like to add a dollop of Light Cool Whip and sprinkle cinnamon on top to garnish. Yum.

10. Place tortillas on a plate and they are ready for dipping. Mmmm.


 ...and this is the result you can expect because they are soooo yummy! I could have demolished the whole pan! Good luck!

Hiking on the perfect Fall...ahem...Summer Day


Today seemed like the perfect day for an outdoor adventure! It started out as a walk that turned into a small hike. It really was the perfect day!


 I could not believe when I saw that the leaves were starting to change! It was a little scary, but I am so excited for Fall! It is my favorite season!

The weather was beautiful and it doesn't get much more peaceful than here!

 I decided to get a final taste of summer before they were all gone! So delicious! #wildblueberries

There is nothing like traipsing cross-country on such a beautiful day! I can honestly say I feel the healthiest, happiest, and most fit that I have ever felt in my life. I was one happy girl!

Cauliflower Crust Pizza


I tried my hand at cauliflower pizza crust last night as an alternative to my usual store-bought, gluten-free pizza crust. Turns out it's amazing, and even my gluten-eating family liked it! Definitely a must-try! 


This super easy crust takes about ten minutes to construct. The hardest part is steaming the cauliflower...like I said, super easy!

You will need:
1 cup of steamed cauliflower grated or mashed
1 egg
1 tbsp. of Parmesan cheese
2 tsp. of basil
2 tsp. of parsley
1 tsp. of oregano
1/2 tsp. of Italian spice
1 small mixing bowl
1 potato masher
1 small pizza pan or baking dish
 Precooked desired pizza toppings (the crust is not in the oven long enough to cook most toppings, but veggies can be left uncooked)
Pizza sauce of your choice

Steps:
1. Preheat oven to 450F.
2. Prepare and cook all desired pizza toppings (I just cooked up some ground beef and Italian sausage and diced some green pepper, onion, and added some canned mushrooms).
3. Mash steamed cauliflower well (I started off by grating it and got lazy, and found that a potato masher is equally effective).
4. Add egg, cheese, and spices.
5. Mash mix with a fork and mix well.
6. Put the mix in a greased pizza pan (I just used cooking spray). Make sure to spread at least 1/2 inch to 1 inch thick - I made mine waaay to thin the first try)
7. Bake at 450F for 12-15 min. or until edge gold AND middle is crisp (you do not want the middle to be uncooked, bleh)
8. Add pizza sauce and PRECOOKED toppings and place back in the oven until toppings are hot  (should take about 5 minutes).


Super tasty! Good luck!